How to Use 1 PVC Pipe for Your DIY Projects?
When it comes to DIY projects, the versatility of a 1 PVC pipe is unmatched. According to expert Mark Johnson, “A 1 PVC pipe can transform simple ideas into practical solutions.” This light yet durable material opens a world of possibilities for crafting, plumbing, and even gardening.
From building furniture to creating art pieces, incorporating a 1 PVC pipe can add unique touches. You can easily cut it to any length needed. Imagine making a stylish plant stand or an innovative workspace organizer. The potential seems endless, yet it can be a challenge to visualize the final product during the planning phase.
Mistakes happen along the way. Perhaps the measurements are off or the design doesn't work as expected. These setbacks can be frustrating, but they offer valuable lessons. Each project with a 1 PVC pipe can teach you about precision and creativity. Embrace the process, and your DIY journey can lead to unexpected triumphs.
Choosing the Right Size and Type of PVC Pipe for Your Project
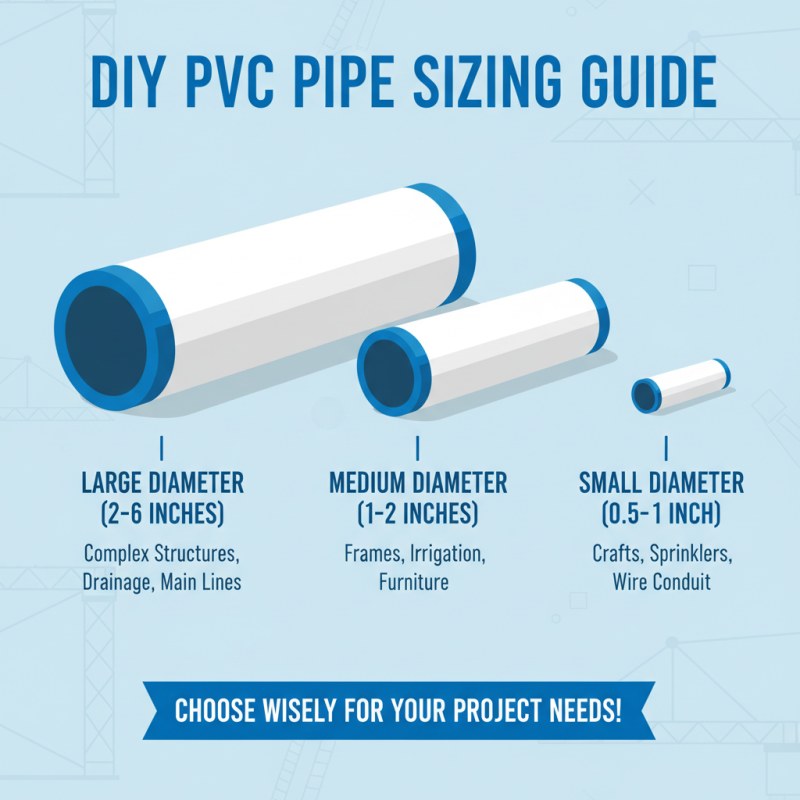
Choosing the right size and type of PVC pipe is essential for any DIY project. PVC pipes come in various diameters, usually ranging from half an inch to several inches. Think about your project's requirements. A smaller diameter may suffice for simple projects, while larger pipes are necessary for more complex structures.
Consider the type of work you plan to do. Schedule 40 PVC is commonly used for many projects because of its durability. However, if you need more flexibility, consider using Schedule 20. It’s lighter but less robust. Reflect on your design. Will it hold weight? Keep in mind that thin pipes may bend under pressure.
When determining length, measure twice. You can always cut the pipe shorter, but you cannot extend it once it's cut. Sometimes estimates go wrong. A project can become frustrating if you realize the piece is too short. Try to visualize the entire setup before cutting. Planning prevents waste and helps create better results.
Essential Tools and Materials for Working with PVC Pipe
When working with PVC pipe, having the right tools and materials is crucial. You will need a sturdy saw to cut pipes neatly. Consider using a miter saw if you have one, as it offers precision. A hand saw can work too, but it requires more effort. Safety goggles are a must, as sawdust can fly into your eyes.
In addition to cutting tools, you'll need a measuring tape and a marker. Measure carefully before cutting. Mistakes can lead to wasted materials. Use a good-quality PVC primer and cement for strong joints. These materials ensure your project holds together well over time.
Tips: Don’t rush your cuts. Slow, steady pressure will yield better results. Test your fittings before gluing. If they don’t fit snugly, adjust your cuts. Remember, it’s okay to make errors—learning is part of the process. Keep some spare pieces handy for practice. This can save you from frustration later. Working with PVC can be rewarding and fun if you invest time in preparation.
Step-by-Step Guide: Cutting and Preparing PVC Pipe
Cutting and preparing PVC pipe can seem daunting, but it’s quite manageable. You need a few tools: a measuring tape, a marker, and a saw designed for plastic. Accurate measurements are crucial. Measure twice, cut once. This mantra can save you from making errors. Always leave room for adjustments. Sometimes, mistakes happen, and that’s okay.
Once you measure your piece, mark it clearly. A straight line ensures a clean cut. Using a saw, cut smoothly. It’s better to take your time. Rushing often leads to uneven edges. After cutting, check the ends. They might be sharp or jagged. Use sandpaper to smooth them out. This step is often overlooked but vital for safety.
Next, you’ll want to prepare the pipe for assembly. Clean any dust from your cuts. A clean surface helps with adhesion. If you are using fittings, ensure they fit snugly. Sometimes, you may find that your cuts aren't perfect, and a little wiggle room is necessary. Don’t hesitate to adjust. This step can be frustrating, yet adjusting ensures a better fit in the long run.
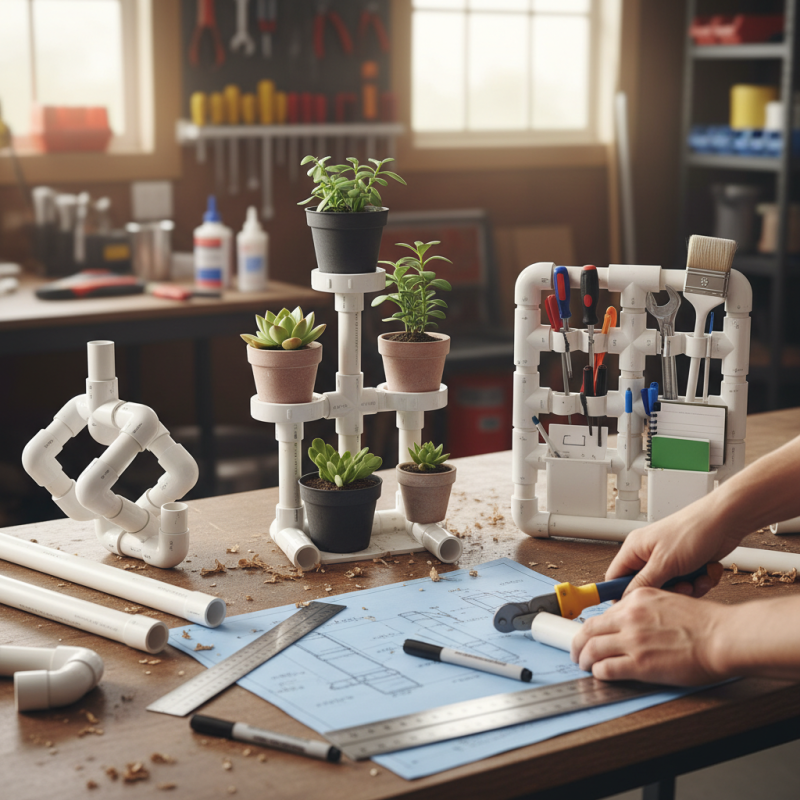
Creative DIY Project Ideas Using a Single PVC Pipe
PVC pipes are versatile and inexpensive for DIY projects. You’d be amazed by what you can create with just one piece. A simple flower holder can transform a dull corner of your garden. Cut the pipe to your desired height, and carve drainage holes. Paint it for a lively touch. Place some soil and then your favorite plants. It’s functional and attractive.
Another idea is to make a unique wall organizer. Cut the pipe into various lengths. Attach the segments to a wooden board or directly to the wall. Use them to hold pens, tools, or even kitchen utensils. The challenge is arranging them aesthetically. You might find yourself adjusting their placements multiple times. Don’t be afraid to try! Each adjustment can lead to unexpected and beautiful results.
Creating a mini bird feeder is another fun option. Cut a few holes in the pipe for birds to access seeds. Suspend it from a tree branch and watch your feathered friends enjoy. This project might not work out perfectly the first time. Birds can be picky. Be patient and enjoy the process of improvement.
How to Use 1 PVC Pipe for Your DIY Projects? - Creative DIY Project Ideas Using a Single PVC Pipe
| Project Idea |
Materials Needed |
Estimated Cost |
Time Required |
| PVC Pipe Bird Feeder |
1 PVC Pipe, Drill, String |
$15 |
1 hour |
| PVC Pipe Plant Holder |
1 PVC Pipe, Paint, Plants |
$20 |
2 hours |
| PVC Pipe Storage Rack |
2 PVC Pipes, Screws, Wall Brackets |
$25 |
3 hours |
| PVC Pipe Pet Bed |
3 PVC Pipes, Fabric, Foam Cushion |
$30 |
2 hours |
| PVC Pipe Side Table |
1 PVC Pipe, Wood Top, Glue |
$40 |
4 hours |
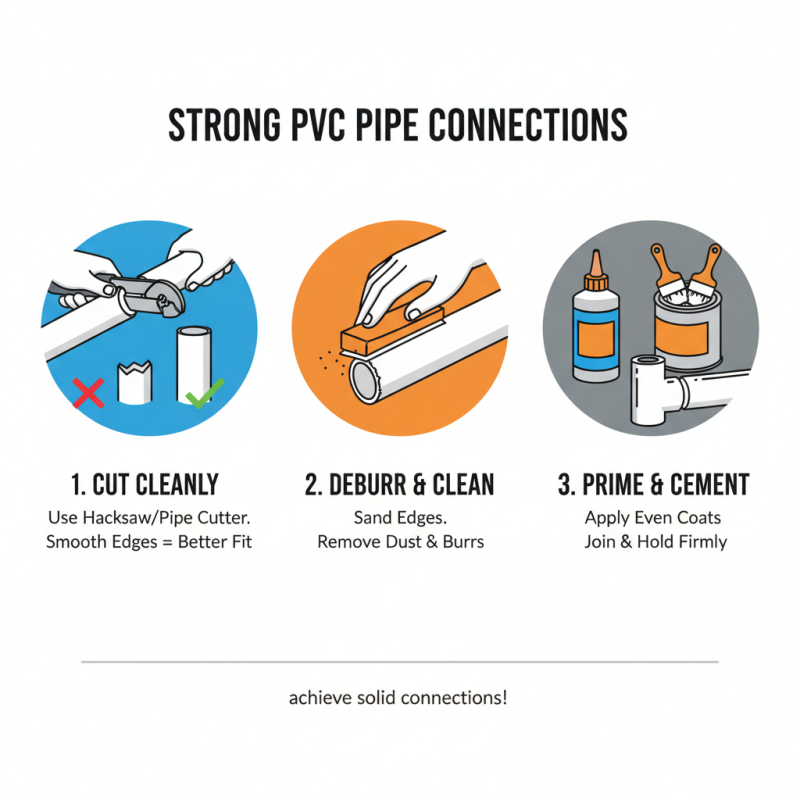
Tips for Joining and Finishing PVC Pipe Connections
Joining PVC pipes can be tricky, but with some tips, you can achieve solid connections. Start by cutting the pipe cleanly; uneven edges will make joining harder. A hacksaw or a pipe cutter works well. After cutting, clean the edges with sandpaper. This step is crucial. It prepares the surface for better adhesion.
When applying PVC cement, remember to use it sparingly. Too much can lead to messy joints. Coat both the pipe and the fitting for a strong bond. Press the pieces together firmly for about 30 seconds. You might feel tempted to check the alignment, but give it time to set. Wait a few hours before testing the strength of your connections.
As you work on your project, mistakes might happen. Maybe a joint doesn’t fit quite right. Don’t panic! You can cut and redo it. It's all part of the learning process. Reflect on what went wrong to improve next time. This trial-and-error approach can lead to better skills and more creative outcomes in your DIY tasks.